Keto-Friendly Chicken Roast with Teriyaki Glaze
Keto-Friendly Chicken Roast with Teriyaki Glaze
Introduction
This recipe delivers a deeply flavorful, succulent chicken roast with a sticky, umami-rich teriyaki glaze, while keeping net carbs impressively low. The technique relies on a two-stage cook: searing for a golden, crispy skin and finishing in the oven for even, juicy doneness. The homemade glaze uses tamari or coconut aminos and a keto-friendly sweetener to achieve the classic sweet-savory balance without sugar. This dish is ideal for an impressive weeknight dinner or a casual weekend gathering. It’s a straightforward recipe suitable for beginner to intermediate home cooks who want to master flavor and texture.
What You’ll Need
Ingredients
- Chicken: 1 whole chicken (4-5 lbs / 1.8-2.2 kg), patted completely dry, or 4 bone-in, skin-on chicken thighs (6-8 oz each)
- Keto Teriyaki Glaze:
- 1/3 cup (80ml) tamari or coconut aminos
- 2 tablespoons (30ml) rice vinegar
- 1 tablespoon (15ml) toasted sesame oil
- 2 cloves garlic, finely minced
- 1 teaspoon fresh ginger, grated
- 1/4 cup (60ml) water or chicken broth
- 2 tablespoons granular erythritol or monk fruit sweetener (or to taste)
- 1 tablespoon arrowroot powder or xanthan gum (for thickening)
- 1 tablespoon cold water (slurry)
- Optional: 1 tablespoon chopped green onion for garnish
- Seasoning Rub:
- 1 tablespoon smoked paprika
- 1 teaspoon garlic powder
- 1 teaspoon onion powder
- 1/2 teaspoon freshly ground black pepper
- 1/2 teaspoon sea salt
- 2 tablespoons avocado oil or olive oil (for searing)
Equipment
- 12-inch oven-safe skillet or Dutch oven (cast iron or stainless steel is ideal) [Check Price on Amazon]
- Instant-read meat thermometer [Check Price on Amazon]
- Small saucepan
- Whisk
- Basting brush
- Tongs
Prep Work
Chicken: If using a whole chicken, ensure it’s fully thawed and remove the giblets from the cavity. Pat the entire chicken, inside and out, completely dry with paper towels. This is the most critical step for achieving crispy skin. Let it sit at room temperature for 20-30 minutes before cooking. For thighs, pat them dry as well.
Rub & Glaze: In a small bowl, combine all the seasoning rub ingredients. In a separate small saucepan (off heat), whisk together all the glaze ingredients except the arrowroot powder and the cold water slurry.
Mise en Place: Have all your ingredients prepped, measured, and ready to go before you turn on the heat. This recipe moves quickly once started.

Cooking Instructions
- Preheat & Season (5 minutes): Preheat your oven to 425°F (220°C). Generously coat the dried chicken all over with the seasoning rub, getting it under the skin of the breast if possible for a whole chicken. Ensure an even layer.
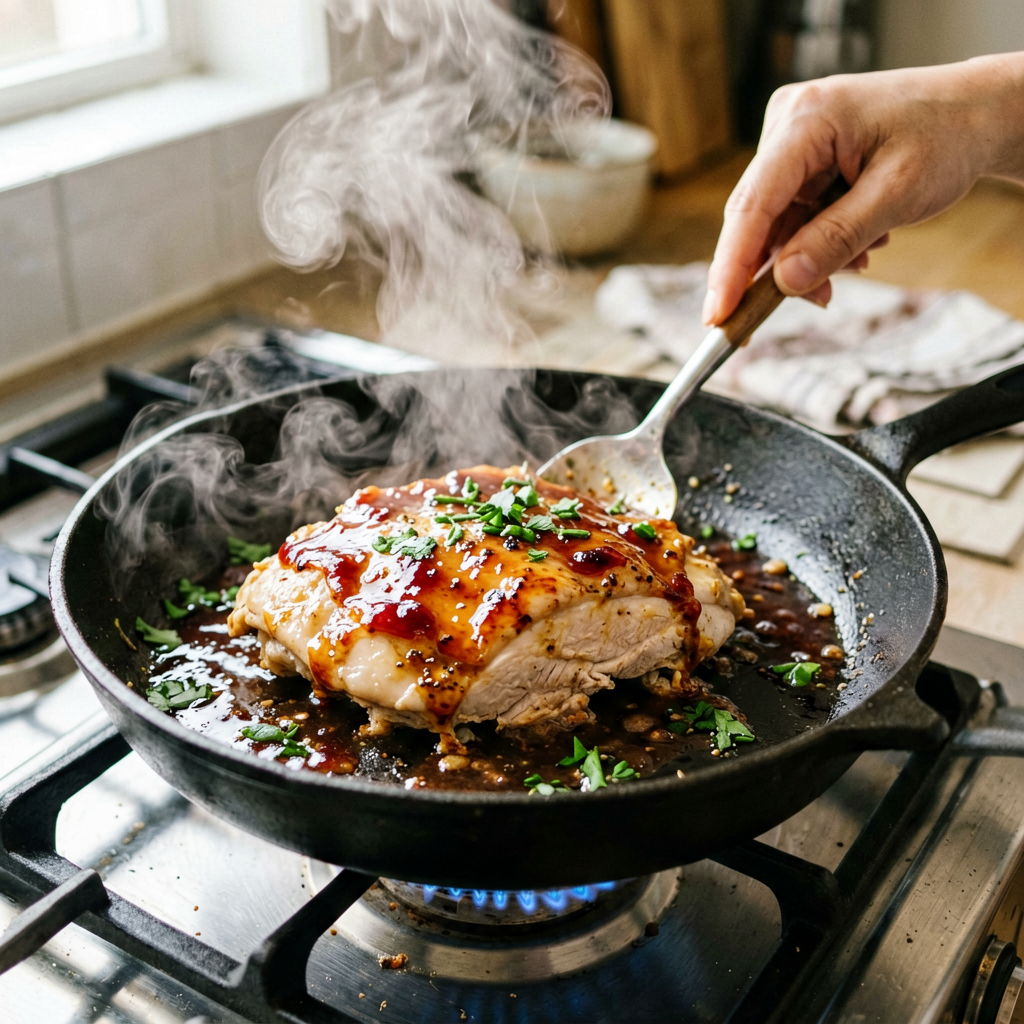
- Sear the Chicken (8-10 minutes): Heat the avocado oil in your oven-safe skillet over medium-high heat until it shimmers. Carefully place the chicken in the pan, skin-side down (for a whole chicken, place it breast-side down). Press gently with tongs to ensure full contact. Sear without moving for 5-6 minutes until the skin is deeply golden brown and crisp. You should hear a steady, confident sizzle. If it’s spattering violently, reduce heat slightly. Flip the chicken. If using a whole bird, sear the other side for 2-3 minutes.
- Roast in the Oven (25-40 minutes): Transfer the skillet to the preheated oven. Roast until an instant-read thermometer inserted into the thickest part of the thigh (avoiding bone) reads 165°F (74°C). This will take approximately:
- Whole chicken (4-5 lbs): 25-30 minutes
- Chicken thighs: 15-20 minutes
- Make the Glaze (while chicken roasts): Bring the glaze mixture in the saucepan to a simmer over medium heat. In a small cup, whisk the arrowroot powder with 1 tablespoon cold water to create a smooth slurry. While whisking the simmering glaze constantly, slowly pour in the slurry. Continue whisking until the glaze thickens to a syrup-like consistency that coats the back of a spoon, about 1-2 minutes. Remove from heat.
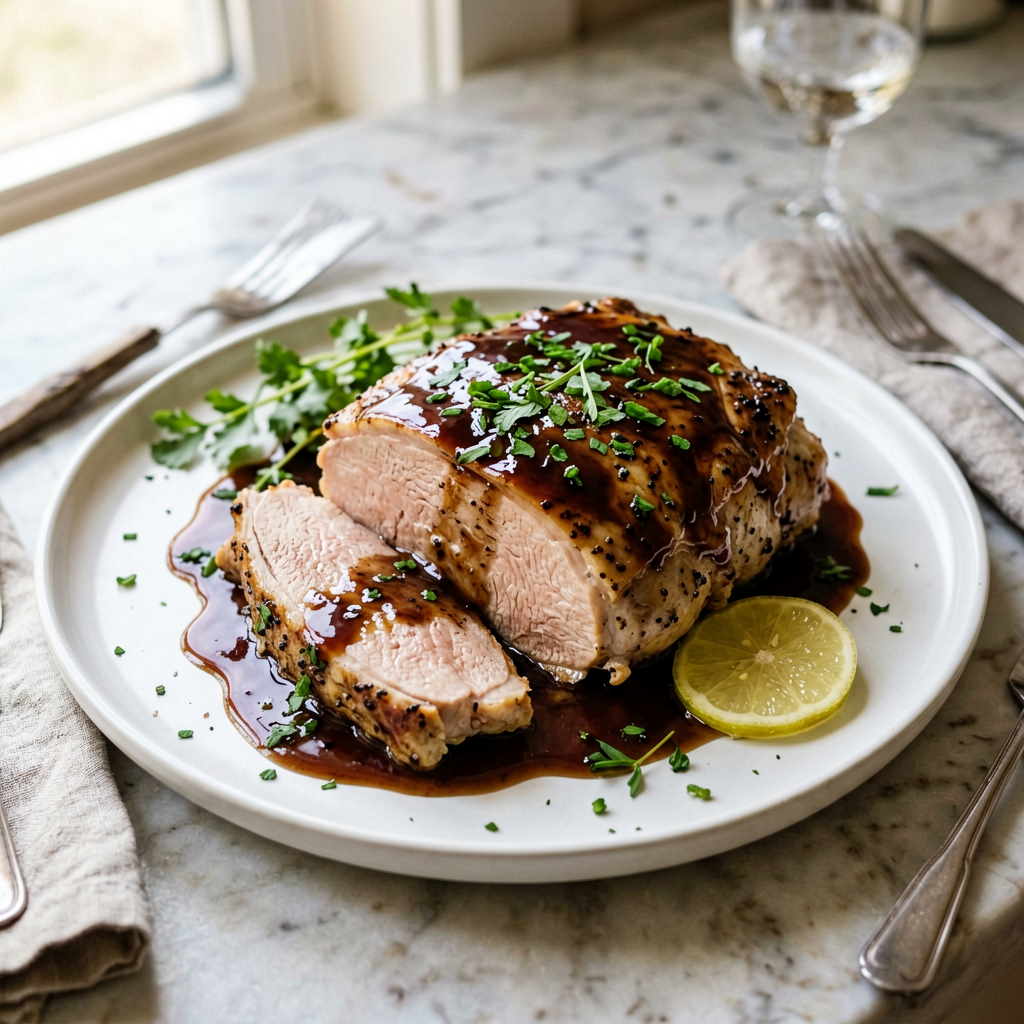
- Glaze & Rest (5 minutes): Once the chicken reaches temperature, remove the skillet from the oven. Immediately brush the entire surface of the chicken generously with the prepared keto teriyaki glaze. Let the chicken rest in the pan, loosely tented with foil, for 5-7 minutes. This allows the juices to redistribute, ensuring moist meat. The residual heat will also help the glaze become stickier.
- Serve: Carve the chicken (if whole) and serve immediately, drizzled with any remaining glaze from the pan. Garnish with chopped green onions.
Pro Tips
- The Dry Chicken Rule: I cannot stress this enough: a dry chicken is the non-negotiable secret to crispy skin. Moisture creates steam, which prevents browning. Pat it like your culinary life depends on it.
- Glaze Timing: Apply the glaze only after the chicken is cooked. Sugar (or sweetener) burns easily. A final brush with the thickened glaze gives you that beautiful, sticky finish without bitterness.
- Resting is Cooking: The chicken’s internal temperature will rise about 5 degrees after you remove it from the oven (carryover cooking). Pulling it out at 160°F (71°C) in the thickest part of the thigh is often perfect, as it will reach the safe 165°F (74°C) during the rest.
- Substitutions: For the glaze, coconut aminos are a great, slightly sweeter alternative to tamari/soy sauce. For the sweetener, allulose also works well and won’t crystallize.
Serving Suggestions
This roast is a complete protein center. For a balanced keto plate, serve it with:
- Steamed Vegetables: A side of steamed broccoli, bok choy, or green beans with a touch of butter and salt.
- Cauliflower Rice: Perfect for soaking up the extra glaze. Fry it in a little sesame oil for extra flavor.
- Simple Salad: A crisp green salad with a light ginger or citrus vinaigrette complements the rich glaze.
Portion Guidance: A serving is typically one thigh or about 4-5 ounces (115-140g) of carved breast meat from the roast.
FAQ
1. Can I use frozen chicken?
For best results, no. Thawing ensures even cooking and allows you to dry the skin thoroughly for crisping. If in a pinch, you can roast from frozen at 375°F (190°C), but the searing step will be skipped, and the skin won’t be as crisp. Increase total cooking time by about 50% and rely heavily on your meat thermometer.
2. How do I know when it’s done?
The only reliable way is with an instant-read thermometer. For any chicken, the safe internal temperature is 165°F (74°C). For juicier results, especially with thighs, pull it at 160°F (71°C) and let it rest. The juices should run clear, not pink, when you pierce the thickest part.
3. Can I prep this ahead?
Yes, strategically. You can mix the seasoning rub and the glaze base (without the thickener) up to 2 days ahead and store them in the fridge. Pat and season the chicken, then refrigerate it uncovered for up to 24 hours—this air-drying further improves the skin. Do not add the glaze until after roasting.
*As an Amazon Associate I earn from qualifying purchases.*>