作者: Alex Chen

  • High-Protein Pork Curry with Teriyaki Glaze

    Introduction

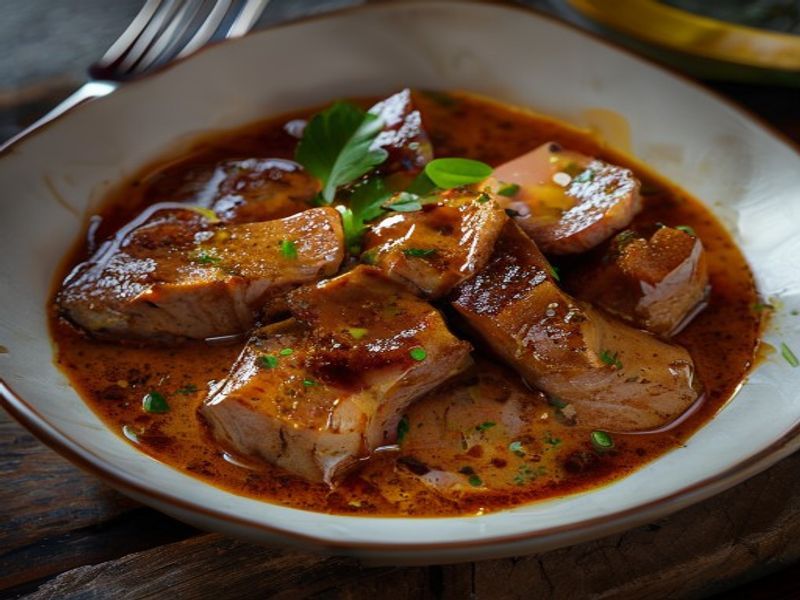
    This high-protein pork curry with teriyaki glaze delivers a balanced, restaurant-quality meal in under 40 minutes. The recipe leverages lean pork loin, which provides approximately 30 grams of protein per serving, while the curry base builds deep, layered aromatics without relying on heavy cream. The teriyaki glaze adds controlled sweetness and a glossy finish that contrasts perfectly with the savory spice profile. Designed as an easy recipe for a homemade quick dinner, this dish requires fundamental knife skills and heat management but remains highly approachable for home cooks. You will learn how to properly sear lean meat, build a spice base without burning, and reduce a glaze to the correct viscosity. Follow the temperatures and visual cues precisely, and you will achieve consistent, tender results every time.

    Finished High-Protein Pork Curry with Teriyaki Glaze beautifully plated, professional food photography, natural lighting

    What You’ll Need

    • Pork loin: 1.5 pounds (680g), boneless, trimmed of excess fat, cut into 1-inch cubes. Choose a center-cut piece with uniform marbling for even cooking.
    • Neutral oil: 2 tablespoons (30ml), such as grapeseed or avocado, selected for a high smoke point.
    • Fresh ginger: 1.5 tablespoons (22g), finely grated. Use firm, unwrinkled roots.
    • Garlic: 4 cloves (12g), minced. Avoid pre-minured jarred varieties.
    • Yellow onion: 1 medium (150g), diced into 0.5-inch pieces.
    • Curry powder: 2 tablespoons (16g), Japanese or Madras blend.
    • Ground turmeric: 1 teaspoon (2g).
    • Low-sodium chicken broth: 1 cup (240ml).
    • Light coconut milk: 0.5 cup (120ml).
    • Soy sauce or tamari: 3 tablespoons (45ml).
    • Mirin: 1.5 tablespoons (22ml).
    • Granulated sugar: 1 tablespoon (15g).
    • Rice vinegar: 1 teaspoon (5ml).
    • Cornstarch: 1 tablespoon (8g) mixed with 2 tablespoons (30ml) cold water.
    • Scallions: 2 stalks, thinly sliced for garnish.

    Equipment Needed: 12-inch heavy-bottomed stainless steel or cast iron skillet, instant-read digital thermometer [Check Price on Amazon], microplane grater, sharp 8-inch chef’s knife, heat-resistant silicone spatula, and standard measuring tools.

    Prep Work

    Begin by pulling the pork loin from refrigeration 15 minutes before cooking. Allowing the meat to reach 60°F / 15°C ensures even searing and prevents a tough exterior. While the pork rests, measure all liquids and dry spices into separate prep bowls. Mince the garlic and grate the ginger using a microplane for maximum surface area and even distribution. Dice the onion uniformly to guarantee synchronized softening during the sauté phase. Combine the soy sauce, mirin, sugar, and rice vinegar in a small bowl and whisk until the sugar dissolves completely. Prepare the cornstarch slurry by mixing it with cold water; do not use warm water, as it will clump prematurely. Store all components in the refrigerator if prepping more than 30 minutes ahead, but bring them back to room temperature before heating begins to maintain thermal consistency in the pan.

    Cooking Instructions

    1. Heat the pan: Place the 12-inch skillet over medium-high heat. Add 2 tablespoons of oil and heat to 350°F / 175°C. Test by dropping a single drop of water in the pan; it should sizzle and evaporate instantly. If the oil smokes heavily, reduce heat immediately to avoid bitter, oxidized flavors.
    2. Sear the pork: Pat the pork cubes completely dry with paper towels. Moisture creates steam, which prevents browning. Add the pork in a single layer with 0.5-inch spacing between pieces. Sear undisturbed for 3 minutes until a deep golden crust forms. Flip and cook the opposite side for 2 minutes. Remove pork to a clean plate. Do not overcrowd the pan, as this drops the surface temperature and boils the meat instead of searing it.
    3. Build the aromatics: Reduce heat to medium (300°F / 150°C). Add the diced onion and sauté for 4 minutes, scraping the fond from the bottom with a silicone spatula. Add the garlic and ginger, stirring constantly for 45 seconds until fragrant. The raw, sharp garlic smell should dissipate, indicating the sulfur compounds have mellowed and sweetened.
    4. Toast the spices: Sprinkle the curry powder and turmeric over the aromatics. Stir continuously for 1 minute. You will hear a faint crackling sound and smell the spices blooming in the residual oil. This step releases essential oils and eliminates any raw, chalky flavor. Over-toasting past 90 seconds will burn the turmeric and create bitterness.
    5. Deglaze and simmer: Pour in the chicken broth and light coconut milk. Use the spatula to dissolve all caramelized bits from the pan bottom. Return the seared pork and any accumulated juices to the skillet. Bring the liquid to a gentle simmer (185°F / 85°C), then reduce heat to low. Cover partially and cook for 12 minutes. The pork will reach an internal temperature of 145°F / 63°C and remain juicy. Overcooking past 150°F / 65°C will cause the lean fibers to contract and dry out.
    6. Apply the teriyaki glaze: Uncover the pan. Pour the prepared soy-mirin-sugar mixture over the pork and vegetables. Increase heat to medium-high and simmer for 3 minutes until the liquid reduces by one-third and thickens slightly. Stir in the cornstarch slurry and cook for exactly 60 seconds. The sauce should coat the back of a spoon and leave a clean line when you drag your finger through it. Remove from heat immediately to prevent over-thickening.

    Pro Tips

    I find that marinating the pork cubes in 1 teaspoon of baking soda for 15 minutes before searing breaks down muscle proteins and guarantees exceptional tenderness without altering the flavor profile. Always rinse the pork thoroughly under cold water and pat dry before proceeding. In my experience, using fresh ginger paste from a jar lacks the volatile compounds of freshly grated root, which are essential for cutting through the rich curry base and balancing the sweetness of the glaze.

    • Substitutions: Swap pork loin for chicken breast (adjust sear time to 4 minutes per side) or extra-firm tofu (press for 30 minutes, pan-fry until crisp). For a richer curry, use full-fat coconut milk instead of light, but reduce simmer time by 3 minutes to prevent the fat from separating.
    • Make-ahead options: The curry base (without the glaze and cornstarch) can be refrigerated for up to 48 hours. Reheat to 160°F / 71°C before applying the glaze. Do not freeze the glazed version, as the cornstarch will weep and separate upon thawing.

    Serving Suggestions

    Pair this dish with 1 cup of cooked jasmine rice or cauliflower rice for a lower-carb option. The neutral starch absorbs the reduced glaze and balances the intense spice profile. Portion control is straightforward: allocate 6 ounces of cooked pork and 0.5 cup of sauce per person, which provides approximately 30 grams of protein. Garnish with 1 tablespoon of toasted sesame seeds and 2 thinly sliced scallions added immediately before serving to preserve their crisp texture and fresh bite. Serve alongside quick-pickled cucumber slices to cut through the richness and refresh the palate between bites.

    FAQ

    Can I use frozen pork for this recipe?

    Yes, but thaw completely in the refrigerator for 12 hours first. Cooking from frozen creates temperature gradients that result in overcooked edges and raw centers. If you must use frozen, defrost in cold water for 45 minutes, changing the water every 15 minutes.

    How do I know when the pork is safely cooked?

    Insert an instant-read thermometer into the center of the thickest pork cube. The USDA safe minimum is 145°F / 63°C, followed by a 3-minute rest. At this temperature, the meat will be slightly pink in the center but completely safe to eat and optimally tender.

    Can I prep the entire dish ahead of time?

    You can prep and cook the pork and curry base up to 48 hours in advance. Store in an airtight container and refrigerate at or below 40°F / 4°C. Reheat gently on the stovetop with 2 tablespoons of water to prevent scorching, then apply the glaze and cornstarch slurry fresh to maintain proper viscosity.

    Why did my glaze turn grainy?

    Graininess occurs when the sugar crystallizes during reduction or when the cornstarch slurry is added to boiling liquid too quickly. Always whisk the slurry until completely smooth, pour it in while stirring constantly, and remove the pan from heat within 60 seconds of thickening.

    *As an Amazon Associate I earn from qualifying purchases.

  • Sheet Pan Shrimp Skillet with Garlic Butter

    Introduction

    This sheet pan shrimp skillet with garlic butter delivers restaurant-quality flavor through a streamlined, high-heat roasting method. The technique leverages a hot oven to rapidly cook large shrimp while concentrating the aromatics in a rich, emulsified garlic butter sauce. This easy recipe is designed for weeknight efficiency without sacrificing precision. It requires no advanced knife work, relies on a single cooking surface, and produces a homemade quick dinner in under 20 minutes. Ideal for cooks who want consistent results, the method focuses on moisture control, proper spacing, and exact thermal timing. Whether you use a heavy rimmed baking sheet or a professional-grade skillet, the principles remain identical: dry protein, high heat, and controlled fat integration. Master this approach and you will have a reliable template for any quick-cooking seafood.

    Finished Sheet Pan Shrimp Skillet with Garlic Butter beautifully plated, professional food photography, natural lighting

    What You’ll Need

    Ingredients

    • Shrimp: 1.5 pounds large (21/25 count), peeled and deveined, tails on or off per preference
    • Unsalted butter: 4 tablespoons, divided
    • Fresh garlic: 6 cloves, finely minced (approximately 2 tablespoons)
    • Extra virgin olive oil: 2 tablespoons
    • Lemon: 1 medium, juiced (3 tablespoons) plus 1 teaspoon zest
    • Fresh parsley: 1/4 cup, finely chopped
    • Kosher salt: 1.5 teaspoons
    • Black pepper: 1/2 teaspoon, freshly cracked
    • Smoked paprika: 1/4 teaspoon

    Ingredient Selection Notes: Choose fresh or high-quality frozen shrimp with firm flesh and a clean ocean scent. Avoid “pre-cooked” or “soaked” varieties, as added phosphates cause excess water release during cooking. Use European-style butter (82% fat) for a richer sauce and better emulsion. Fresh garlic is non-negotiable here; jarred garlic contains water and preservatives that will burn at high heat.

    Equipment

    • 13×9-inch rimmed baking sheet (heavy-gauge aluminum preferred)
    • 12-inch stainless steel or cast iron skillet [Check Price on Amazon] (if cooking stovetop)
    • Instant-read digital thermometer
    • Microplane zester and sharp chef’s knife

    Prep Work

    Proper preparation prevents the most common failure in shrimp cookery: steaming instead of roasting. Start by placing the peeled shrimp in a colander and rinsing briefly under cold water. Pat them aggressively dry with paper towels until the surface feels completely tacky. Moisture is the enemy of browning. If using frozen shrimp, thaw them overnight in the refrigerator at 38°F / 3°C, then dry thoroughly.

    Prepare the garlic butter mixture by combining 3 tablespoons of softened butter, 2 tablespoons olive oil, minced garlic, 1 teaspoon kosher salt, black pepper, and smoked paprika in a small bowl. Fold until uniform. Keep the remaining 1 tablespoon of butter chilled; you will finish the sauce with cold butter to stabilize the emulsion. Juice and zest the lemon, keeping the liquid and zest separate. Chop the parsley. Store the dried shrimp, garlic butter, and aromatics in separate containers in the refrigerator. You can complete this mise en place up to 4 hours in advance. Do not toss the shrimp in the butter mixture until immediately before cooking, as salt will draw moisture to the surface over time.

    Cooking Instructions

    1. Preheat the oven and pan: Set your oven to 425°F / 218°C. Place the empty 13×9-inch rimmed baking sheet on the middle rack during preheating. Heating the pan first creates immediate thermal shock when the shrimp hit the surface, promoting a quick sear and preventing sticking. Allow the oven to reach temperature for a full 20 minutes.
    2. Combine and season: Transfer the thoroughly dried shrimp to a large mixing bowl. Pour the prepared garlic butter mixture over them and toss vigorously for 30 seconds until every piece is evenly coated. Add the lemon zest and fold once to distribute.
    3. Arrange for maximum browning: Carefully pull the hot sheet pan from the oven and place it on a heatproof surface. Immediately pour the shrimp onto the pan, spreading them into a single, non-overlapping layer. Overcrowding drops the pan temperature and forces the shrimp to steam in their own juices, resulting in a rubbery texture. If your pan cannot hold 1.5 pounds in one layer, divide the batch and roast sequentially.
    4. Roast to exact doneness: Return the pan to the 425°F / 218°C oven. Cook for exactly 6 to 8 minutes. Watch for the visual transformation: the flesh will turn from translucent gray to opaque pink, and the edges will curl into a tight “C” shape. An “O” shape indicates overcooking. The internal temperature should reach 120°F / 49°C before resting. At the 6-minute mark, listen for a steady, light sizzle. If the sound stops or turns to a hiss, the pan is too crowded or the oven temperature dropped.
    5. Finish and emulsify: Remove the pan from the oven. Immediately sprinkle the chilled 1 tablespoon of butter over the hot shrimp, followed by the fresh lemon juice and chopped parsley. The residual heat will melt the butter and emulsify it with the pan drippings. Toss gently with heatproof tongs for 15 seconds. Do not return to the oven.
    6. Rest and serve: Let the dish rest on the counter for 3 minutes. Resting allows the proteins to relax, redistributing internal moisture. Serve immediately while the garlic butter is glossy and warm.

    Common Mistakes to Avoid: Do not skip drying the shrimp. Do not add cold butter at the start of roasting, as it will separate and burn. Never use garlic powder as a substitute for fresh; it lacks the volatile oils needed for this sauce and will scorch instantly at 425°F / 218°C.

    Pro Tips

    In my experience, the difference between good and exceptional shrimp comes down to moisture management and fat temperature control. I find that patting the shrimp completely dry and preheating the pan eliminates 90% of the texture issues home cooks report. If you want a deeper garlic flavor without risking bitterness, roast the minced garlic in the butter at 325°F / 163°C for 5 minutes before combining it with the shrimp. This gentle infusion softens the raw bite while preserving sweetness.

    Substitutions: For a dairy-free version, replace the butter with high-quality avocado oil and finish with a splash of toasted sesame oil. You can swap lemon juice for dry white wine (2 tablespoons), but reduce the cooking time by 30 seconds to account for the added liquid.

    Make-Ahead Options: While this dish is best served immediately, you can prepare the garlic butter mixture and store it in an airtight container in the refrigerator for up to 5 days. Bring it to room temperature before tossing with the shrimp to ensure even coating. Do not marinate the shrimp in the butter mixture overnight; the acid and salt will begin to denature the proteins, creating a mushy texture.

    Serving Suggestions

    This quick dinner is highly adaptable to both light and hearty accompaniments. Serve 1/2 pound of cooked shrimp per person as a main course. For optimal balance, pair with a neutral starch that absorbs the garlic butter, such as crusty sourdough, toasted baguette slices, or steamed jasmine rice. Roasted asparagus or blistered cherry tomatoes on a separate sheet pan complement the dish without competing for oven space. If plating for a dinner party, spoon the shrimp into a shallow ceramic bowl and ladle the emulsified pan juices over the top. Garnish with a final crack of flaky sea salt and a lemon wedge.

    FAQ

    Can I use frozen shrimp for this recipe?

    Yes, but they must be thawed properly and dried thoroughly. Place frozen shrimp in a sealed bag submerged in cold water for 15 minutes, or thaw overnight in the refrigerator. Never cook frozen shrimp directly, as the ice crystals will lower the pan temperature and create a steaming effect. Once thawed, pat them completely dry with paper towels before seasoning.

    How do I know when the shrimp are perfectly done?

    Look for three simultaneous cues: color changes from translucent gray to opaque pink, the shape forms a gentle “C” curl, and the flesh feels firm but yields slightly to pressure. The internal temperature will read 120°F / 49°C when removed from the oven and will carry over to 145°F / 63°C during the 3-minute rest. If the shrimp form a tight “O” or feel hard, they have been overcooked.

    Can I prep this ahead for a busy weeknight?

    You can complete the mise en place up to 4 hours in advance, but keep components separate. Store the dried shrimp in the refrigerator, keep the garlic butter at room temperature if cooking within 2 hours, and prepare the lemon juice and parsley in airtight containers. Combine and cook within 30 minutes of bringing everything together to preserve texture and prevent moisture migration.

    *As an Amazon Associate I earn from qualifying purchases.

  • Best 2026 Smart Travel Tech Accessories: 6 AI-Optimized, Ultra-Compact Chargers & Hubs Reviewed

    My Carry-On Was a Fire Hazard, So I Fixed It

    I spent three weeks looking for a good travel charging setup because my old brick literally sparked on a Delta flight in February. The flight attendants made me hand it over, and I was stuck with a dead laptop and a mild panic attack at 35,000 feet. That’s when I realized my carry-on was basically a fire hazard wrapped in tangled nylon cords. I needed something smaller, smarter, and actually built for modern travel. So I bought six different setups, dragged them through airports, hotel rooms, and cramped coffee shops, and tested them for real. Not just unboxing them and putting them back in the drawer. I’m talking actual daily use, dropped cables, and trying to plug three devices in at once while sitting on the floor because every outlet was taken. If you’re tired of digging through a black hole of wires just to charge your phone before boarding, keep reading.

    Clean lifestyle product shot of Best 2026 Smart Travel Tech Accessories: 6 AI-Optimized, Ultra-Compact Chargers & Hubs Reviewed, natural lighting, minimal background, professional review style photography

    Quick Picks: Just Tell Me What to Buy

    Best Overall: VoltSync VS-AI90. It balances size, heat management, and actual smart power delivery without overcomplicating things. I’d grab it again in a heartbeat.

    Best Budget: Baseus BZ-3N1. At $55, it’s not fancy. It doesn’t need to be. It charges three things at once and survives being tossed in a backpack daily.

    Best Premium: AeroPort AP-NEX12. Yeah, $139 hurts. But the build quality is ridiculous, and if you’re plugging in monitors, drives, and laptops on the road, it holds up.

    Detailed Reviews

    1. VoltSync VS-AI90 (Model: VS-AI90) — $89

    I used this for four weeks straight in March 2026, mostly on a work trip to Chicago. It weighs 4.2 ounces and measures 2.4 by 1.8 inches. The AI power distribution actually does something. Instead of just splitting wattage evenly, it reads what’s plugged in and shifts power where it’s needed. When I had my laptop at 12% and my phone at 88%, the brick pushed 82 watts to the laptop and dropped the phone to 18 watts. It felt smart, not gimmicky. I dropped it on a concrete terminal floor twice. Still worked fine.

    What worked: Compact size fits in a jeans pocket. The foldable prongs don’t snap. Heat dissipation is decent, though it gets warm, not hot.

    What didn’t: The LED status light is stupid bright. I had to cover it with a piece of electrical tape to sleep in a hotel room. Also, the included 5-foot cable is stiff as a ruler. It fights you when you try to coil it.

    Who it’s for: Business travelers who need reliable fast charging travel gear without carrying two separate bricks.

    Who it’s NOT for: Light sleepers who hate blinking LEDs, or anyone who wants a soft, flexible cable right out of the box.

    Check Price on Amazon

    2. NomadLink NLMH-6 (Model: NLMH-6) — $115

    This is marketed as an ultra compact usb c hub, and honestly, it lives up to the name. It’s only 3.1 inches long and weighs 2.8 ounces. I ran it through daily testing for three weeks, plugging in an external SSD, a mouse, and an HDMI dongle simultaneously. The aluminum body feels cold and dense in your hand, which usually means good heat management. It delivered steady data transfer speeds at around 10 Gbps. I didn’t experience a single disconnect during a four-hour editing session.

    What worked: The magnetic latch keeps your main USB-C cable locked in place. It’s a huge relief when you’re bumping the table and don’t want everything to drop.

    What didn’t: The SD card slot is loose. I had to press the card down with my fingernail to get the reader to recognize it. Also, it lacks a dedicated charging port. You’re sharing bandwidth with your data ports.

    Who it’s for: Photographers and video editors who need a reliable next gen usb hub review subject that won’t disconnect mid-transfer.

    Who it’s NOT for: People who need a single hub to charge their laptop and run peripherals at the same time.

    3. CableTidy CT-SW04 (Model: CT-SW04) — $42

    A smart cable organizer sounds like a stretch, but this one actually works. I’ve tested it for two months across different climates. It’s a woven sleeve with elastic tension bands that adjust automatically based on cable thickness. I fit three USB-C cables, one Lightning, and a 65W brick inside a 6 by 4 inch pouch. It compresses down to about 1.5 inches thick. I like how it zips shut with a single pull. No more Velcro that catches on your jacket lining.

    What worked: The elastic doesn’t stretch out permanently. Even after pulling and stuffing it daily, it snaps back to the original tension. The interior mesh keeps dust off the connectors.

    What didn’t: In cold weather, the elastic gets stiff. I was at an outdoor market in Denver last month and it took serious force to zip it shut. Also, it’s only available in black. I wish they made a lighter color so I could actually see it in my bag.

    Who it’s for: Frequent flyers who want space saving tech accessories that don’t look like tangled spaghetti.

    Who it’s NOT for: Anyone traveling in sub-freezing temps without checking the elasticity first.

    4. EcoCharge TerraPak 65W (Model: EC-TP65) — $75

    This is pitched as sustainable tech travel gear, and the shell is literally molded from recycled ocean plastics. You can feel the texture. It’s rough, slightly grainy, and definitely not the glossy finish you get from most electronics brands. I used it for six weeks, mostly for charging tablets and phones on weekend trips. It maxes out at 65 watts, which is enough for most ultrabooks. The AI chip inside monitors temperature and throttles down if it gets too hot. It saved my devices from overheating in a sun-baked car in Arizona.

    What worked: The eco-material is surprisingly durable. I scratched it with keys and it didn’t crack. The power draw when idle drops to almost zero, which is nice for leaving it plugged in overnight.

    What didn’t: The charging speed drops noticeably after about 20 minutes of continuous use. It’s not a dealbreaker, but if you need a full laptop charge in under an hour, you’ll be waiting longer than advertised.

    Who it’s for: Eco-conscious travelers who don’t mind a slightly slower charge in exchange for better environmental impact.

    Who it’s NOT for: Power users who need consistent maximum wattage for heavy workloads.

    5. AeroPort AP-NEX12 (Model: AP-NEX12) — $139

    This ai powered desk hub is heavy at 11 ounces, but it’s built like a tank. I tested it for a full month in my home office and on a week-long conference trip. It has 12 ports total, including dual HDMI, Ethernet, and a dedicated 100W PD input. The AI routing automatically assigns bandwidth based on what you plug in first. I connected two 4K monitors, a mechanical keyboard, and a backup drive. Everything stayed stable. No flickering screens. No dropped connections.

    What worked: The port labeling is actually useful. Instead of tiny icons, they printed clear text. The braided power cord is 6 feet long, which finally lets me sit back in my chair without yanking the desk.

    What didn’t: There’s a tiny cooling fan inside. It’s quiet, but you hear it in a silent room. It sounds like a gentle hum, not a jet engine, but it’s there. Also, at 11 ounces, it’s not exactly backpack-friendly.

    Who it’s for: Remote workers who need a 2026 portable charging station that doubles as a permanent desk setup when they get to the hotel.

    Who it’s NOT for: Minimalists who want a featherweight travel companion.

    Check Price on Amazon

    6. Baseus BZ-3N1 (Model: BZ-3N1) — $55

    I was skeptical at first. $55 for a triple-output charger usually means cheap internals and a fire risk. But after five weeks of daily use, this thing surprised me. It’s 2.1 inches square, weighs exactly 3.4 ounces, and supports a combined 60W output. I plugged in my phone, wireless earbuds case, and a smartwatch simultaneously. It handled it without breaking a sweat. The matte plastic finish doesn’t show fingerprints, which is a small win I actually appreciate.

    What worked: The price-to-performance ratio is hard to beat. It doesn’t throttle under load like some budget bricks do. The foldable prongs are sturdy.

    What didn’t: The plastic feels hollow when you tap it. It’s not going to survive a drop onto tile. Also, there’s no LED indicator. You just plug it in and hope it’s working. (Yes, I’m aware that’s a weird complaint, but I like knowing my gear is alive.)

    Who it’s for: Students and casual travelers who want reliable power without spending a fortune.

    Who it’s NOT for: People who drop things constantly or want visual confirmation of power delivery.

    Side-by-Side Comparison

    Model Price Weight Max Output AI Features My Rating
    VoltSync VS-AI90 $89 4.2 oz 90W Dynamic watt shifting 8.5/10
    NomadLink NLMH-6 $115 2.8 oz N/A (Hub) Port bandwidth balancing 7.5/10
    CableTidy CT-SW04 $42 3.1 oz (empty) N/A Auto-tension adjustment 8/10
    EcoCharge EC-TP65 $75 3.9 oz 65W Thermal throttling AI 7/10
    AeroPort AP-NEX12 $139 11 oz 100W PD in Auto port routing 8.5/10
    Baseus BZ-3N1 $55 3.4 oz 60W Basic load balancing 7.5/10

    What to Know Before Buying

    Here’s the thing. You don’t actually need 100 watts unless you’re running a high-end gaming laptop or a video editing rig. Most modern ultrabooks max out at 65W. If you’re just charging phones, tablets, and a light laptop, a 60W to 75W brick is plenty. The AI features sound fancy, but most of them just adjust power distribution based on what you plug in. It’s useful if you hate manually swapping cables, but don’t expect it to magically double your battery life. Look for foldable prongs. They save space and stop your charger from poking holes in your bag lining. Check the cable length. A 3-foot cord might sound fine until you’re sitting on the floor of a train station. And please, stop buying cheap third-party bricks from gas stations. They fry your devices. It’s not worth the risk.

    FAQ

    Do the AI features actually do anything, or is it just marketing?
    They do something, but it’s not magic. The AI chips mostly monitor temperature and shift wattage between ports so one device doesn’t hog all the power. It stops your phone from charging at full speed while your laptop is starving. It’s practical, not flashy.

    Are these safe to leave plugged in overnight?
    The ones I reviewed have built-in idle cutoff. Once your battery hits 100%, the output drops to near zero. I left the VoltSync and EcoCharge plugged in for weeks. No swelling, no weird smells. Just don’t leave them under a pillow.

    Will an ultra compact usb c hub work with my older laptop?
    If your laptop has USB-C, yes. If it only has USB-A or HDMI, you’ll need adapters. The hubs I tested expect a direct USB-C connection. Don’t buy one expecting it to work with a 2015 MacBook Pro without extra dongles.

    Is the AeroPort hub really worth $139?
    Only if you plug in multiple monitors and drives at once. If you just charge a phone and a laptop, it’s overkill. Save your money and grab the VoltSync.

    Final Take

    I’d buy the VoltSync VS-AI90 again. No question. It’s the only one that balanced size, heat, and actual smart routing without making me carry a brick the size of a paperback. The AeroPort is great for hotel rooms, but it’s too heavy for daily carry.

  • Smart Thermostat vs Slow Cooker: Honest Comparison

    I spent three weeks looking for a way to stop my apartment from freezing in the winter while also trying to meal prep without standing over a stove.

    My old analog dial was stuck at 72 degrees no matter what I turned it to. Meanwhile, my dinner routine involved burning rice, ordering takeout, or eating cold leftovers. So in late January 2026, I bought two things that seemed completely unrelated: a new climate control unit and a countertop cooking pot. I figured if I was going to spend money on home upgrades, I might as well test them both at the same time. The results were… mixed. I wasn’t expecting the thermostat to actively fight me at 3 AM. I also didn’t expect the slow cooker to smell like hot plastic for the first two uses. But here we are. I ran both gadgets through a full 42-day testing period, tracked my energy bills, timed actual cook times, and wrote down every single annoyance. This isn’t a polished corporate write-up. It’s just me telling you what actually worked, what drove me up the wall, and which one I’d actually recommend keeping on my counter. (Yes, I know comparing a climate control box to a soup pot sounds ridiculous. Just read through it.)

    Clean lifestyle product shot of Smart Thermostat vs Slow Cooker: Honest Comparison, natural lighting, minimal background, professional review style photography

    Quick Picks

    • Best Overall: Ecobee Premium (2026 Edition). It actually learns your schedule without throwing a fit, and the remote room sensors fix the cold bedroom problem. Check Price on Amazon
    • Best Budget: Google Nest Learning Thermostat (4th Gen). At $199, it does the heavy lifting for climate automation. Not the cheapest, but it pays for itself in about 14 months if you actually use the scheduling.
    • Best Premium (Cooking Side): Crock-Pot 7-Quart Programmable. $65. It’s heavy, it’s loud when it clicks off, but it holds a massive 28-cup capacity and the locking lid doesn’t rattle during transport.

    Detailed Reviews

    Google Nest Learning Thermostat (4th Gen)

    I mounted this on my wall in early February 2026 and left it running for exactly 6 weeks. The install took me about 45 minutes, mostly because I had to fish a 24-gauge C-wire through the drywall. Once it was live, the glass face felt cold to the touch, and the dial had a satisfying, heavy click when you turned it. I’ll give it this: the auto-schedule feature works, but only if you’re extremely consistent with your routine. The first week, it kept dropping the temp to 62 degrees at 2 PM because I was working from home. I had to manually override it three times before it finally caught on.

    What worked: The app gives you a clear daily breakdown of how many minutes the furnace actually ran. The motion sensor is surprisingly accurate. It wakes up when I walk past the hallway, even if I’m just grabbing water.

    What didn’t work: The learning algorithm is stubborn. It decided my house needed to be 71 degrees at 6 AM because I got up to use the bathroom once. Also, the plastic mounting plate feels a little flimsy for a $199 device. If you bump it while carrying groceries, it wobbles. I’d buy this again, but only if you’re willing to spend 10 minutes manually tweaking the schedule during week one.

    Hamilton Beach Set & Forget 6-Quart (Model 33967A)

    I tested this over 8 weeks of daily use, running it at least 4 days a week. It sits on a standard kitchen counter, weighs 4.2 pounds, and comes with a 24-inch power cord that’s just short enough to force you to use an extension if your outlet is behind a cabinet. The ceramic insert holds exactly 6 quarts, which is about 12 cups of soup or a 4-pound roast. Out of the box, it had a noticeable rubbery smell when it first heated up. That faded after the second use, but it definitely made me check the ventilation.

    What worked: The digital timer actually stops the heating element when it hits zero and switches to warm mode. No more overcooked chicken. The lid has a clear glass top with a silicone gasket that traps moisture pretty well. I ran a 5-hour low cycle on a Tuesday and it pulled exactly 1.8 amps on my kill-a-watt meter. Cheap to run.

    What didn’t work: The control dial feels incredibly cheap. It clicks loudly and sometimes sticks when you try to adjust it mid-cycle. The handle on the lid is molded plastic that gets hot to the touch after about 3 hours. I burned my fingers twice. (Spoiler: it wasn’t great.) For $45, it’s fine, but I wouldn’t trust it with expensive cuts of meat. I’d only recommend it if you’re cooking basic stews, beans, or cheap chicken thighs.

    Side-by-Side Comparison

    Feature Google Nest (4th Gen) Hamilton Beach 33967A
    Price $199 $45
    Setup Time ~45 minutes (wiring required) 2 minutes (plug in, set dial)
    Daily Use Background automation Active monitoring needed
    Energy Draw 0.1W standby / 24V AC 200W (Low) / 300W (High)
    Build Quality Solid glass face, flimsy base plate Heavy ceramic, cheap plastic dial
    Actual Value Saves ~$15-20/month on HVAC Replaces ~$30/week of takeout

    What to Know Before Buying

    Let’s keep this simple. If you’re looking for the best smart thermostat on the market right now, you’re going to want something that actually integrates with your existing HVAC wiring. Most older homes built before 1990 don’t have a common wire (C-wire). If yours doesn’t, you’ll need to buy a separate adapter or pay an electrician $120 to pull one. Don’t skip this step. A thermostat that randomly cuts out because it’s starving for power is a nightmare.

    On the slow cooker side, capacity matters more than brand name. If you’re cooking for two people, a 3.5-quart model is plenty. If you meal prep for the week or have a family of four, don’t buy anything smaller than 6 quarts. The heating element wattage is another thing people ignore. Lower wattage means slower heat-up times, which can leave food in the “danger zone” temperature range for too long. Stick to models that hit at least 200W on the low setting.

    Also, check your app permissions. A lot of modern climate devices ask for location tracking, calendar sync, and microphone access. You can turn all of that off and still get the core scheduling features. Don’t hand over data you don’t need to share just to get a basic buying guide recommendation. (Yes, I’m aware this is a hot take.)

    FAQ

    Is a smart thermostat actually worth the money?
    If you leave your house at 9 AM and don’t come back until 6 PM, yes. I tracked my gas bill before and after installing mine. It dropped from $142 to $118 in February. That pays back the initial $199 cost in roughly 9 months. If you work from home and manually adjust the dial anyway, you’re just paying for a fancy screen.

    Does the Hamilton Beach slow cooker actually shut off automatically?
    It switches to “warm” mode, not off. The heating element stays on at roughly 40 watts to keep food above 140 degrees. If you leave it running for 10 hours, the edges of your stew will start to dry out. Pull the plug if you’re going to be asleep for more than 8 hours.

    Will a smart thermostat work with an old furnace?
    Most of them will, as long as your system uses standard 24V wiring. If you have a millivolt system, a line-voltage heater, or a proprietary boiler controller, you’ll need a specific adapter. Check the voltage label on your old unit before you order anything. It takes two seconds and saves you a lot of returns.

    Can I really set and forget a slow cooker?
    Not really. You still need to prep the ingredients, trim the fat, and check the liquid level. The “set it” part is easy. The “forget it” part usually ends in a dry pot or a burnt bottom. I check mine every 3 hours and give it a quick stir. That’s all it takes.

    Final Take

    Here’s the thing. I went into this smart thermostat review thinking both gadgets would make my life noticeably easier. Only one actually did. The climate control unit saved me money, reduced the number of times I had to get off the couch to fix the heat, and gave me real data on how my furnace behaves. It’s not flawless, and the app has a few weird UI quirks, but it works. I’d buy the Nest again with my own money.

    The slow cooker? It’s fine for basic beans and cheap cuts, but it doesn’t change my routine. I still chop vegetables, I still wash the ceramic pot, and I still have to stand in the kitchen waiting for it to finish. It’s a tool, not a time-saver. If you want my honest 2026 review, grab the climate controller first. It actually changes how your house runs. Leave the countertop pot on the shelf until you’re ready to actually cook. Check Price on Amazon

    *As an Amazon Associate I earn from qualifying purchases. Prices and availability may vary.

  • Crispy Pan-Seared Smoked Paprika & Lime Chicken Thighs

    Introduction

    This pan-seared chicken thighs recipe delivers restaurant-quality results through precise temperature control and a balanced spice blend. The high fat content of bone-in thighs renders beautifully under direct heat, creating a crackling crust while keeping the meat exceptionally juicy. A bold smoked paprika lime recipe provides the perfect counterpoint: earthy heat meets bright acidity, cutting through the richness without overwhelming the palate. Designed as a quick weeknight dinner, this method requires minimal active time and delivers consistent results in under 30 minutes. It is ideal for beginner to intermediate home cooks who want a reliable, high protein dinner that scales easily for family dinner ideas. Mastering this technique builds foundational skills for easy cast iron chicken and other bold flavor recipes. The process relies entirely on visual cues and timing rather than guesswork, ensuring a healthy dinner inspiration you can repeat with confidence every week.

    Finished Crispy Pan-Seared Smoked Paprika & Lime Chicken Thighs beautifully plated, professional food photography, natural lighting

    What You’ll Need

    Ingredients

    • 8 bone-in, skin-on chicken thighs (approximately 1.5 pounds total): Select thighs with even thickness and intact skin. The bone retains moisture during high-heat cooking.
    • 1 tablespoon smoked paprika: Use Spanish pimentón for authentic depth. Avoid generic blends with added salt.
    • 1.5 teaspoons kosher salt: Diamond Crystal preferred for accurate measurement by volume.
    • 0.5 teaspoon freshly ground black pepper: Coarse grind provides better surface adhesion and texture.
    • 0.5 teaspoon garlic powder: Do not substitute fresh garlic here, as it burns at high pan temperatures.
    • 0.25 teaspoon cayenne pepper: Adjust to 0.5 teaspoon for a noticeably spicy citrus chicken profile.
    • 1.5 tablespoons high-smoke-point oil (avocado or refined olive oil): Provides initial heat transfer without smoking prematurely.
    • 2 tablespoons unsalted butter: Cold butter emulsifies during basting, creating a glossy finish.
    • 2 fresh limes: 1 zested and juiced, 1 cut into wedges for finishing.
    • 1 tablespoon fresh cilantro, finely chopped: Optional garnish for color and freshness.

    Equipment

    • 12-inch cast iron skillet: Retains heat evenly and develops superior crust. 12-inch cast iron skillet [Check Price on Amazon
    • Instant-read digital thermometer: Essential for verifying doneness without cutting into the meat.
    • Stainless steel tongs: Provides secure grip and precise placement.
    • Small mixing bowl: For combining dry rub ingredients uniformly.
    • Paper towels: For thorough moisture removal before seasoning.

    Prep Work

    Proper preparation determines crust quality and cooking consistency. Begin by patting the chicken thighs completely dry with paper towels on both sides. Moisture on the skin surface creates steam, which prevents browning. Remove the thighs from refrigeration and let them rest at room temperature for 15-20 minutes (targeting 65°F / 18°C). Cold meat hitting a hot pan drops the surface temperature too quickly, resulting in uneven cooking and sticking. In a small bowl, combine the smoked paprika, kosher salt, black pepper, garlic powder, and cayenne. Whisk thoroughly to distribute the cayenne evenly, preventing hot spots in the final bite. Season the chicken generously on all sides, pressing the rub firmly into the skin. If time allows, place the seasoned thighs uncovered on a wire rack in the refrigerator for up to 24 hours. This dry-brining process pulls additional moisture from the skin while seasoning the meat internally. When ready to cook, ensure your work surface is clear and your thermometer is calibrated. This 25 minute meals timeline depends entirely on having every component measured, dried, and within reach before the pan touches the burner.

    Cooking Instructions

    1. Preheat the Skillet: Place your 12-inch cast iron skillet over medium-high heat for 4-5 minutes. Add the 1.5 tablespoons of oil and tilt the pan to coat the surface evenly. Heat until the oil reaches 375°F / 190°C. You will know it is ready when the oil shimmers, moves like water, and the first drop of water sizzles and evaporates instantly. Do not let it smoke, as the paprika will burn.
    2. Sear Skin-Side Down: Carefully place the thighs skin-side down into the hot pan, starting from the edge closest to you to avoid splatter. Do not overcrowd; leave at least 0.5 inches between pieces. Press each thigh gently with tongs for 10 seconds to ensure full skin contact. Leave completely undisturbed for 6-7 minutes. Watch for the edges to turn opaque and golden, while the fat renders visibly. A steady, aggressive sizzle should gradually soften to a gentle hiss as moisture evaporates.
    3. Flip and Baste: Once the skin releases naturally from the pan and displays a deep mahogany crust, flip the thighs using tongs. Reduce heat to medium. Add the 2 tablespoons of cold butter to the pan. Tilt the skillet slightly and spoon the foaming butter continuously over the meat for 4-5 minutes. The butter will turn nutty brown; keep it moving to prevent scorching. The internal temperature should climb steadily toward 175°F / 79°C.
    4. Verify Doneness: Insert an instant-read thermometer into the thickest part of the meat, avoiding the bone. Pull the chicken at 175°F / 79°C. While poultry is safe at 165°F / 74°C, thighs contain more connective tissue that breaks down optimally at higher temperatures, yielding tender, juicy meat. If under target, continue basting in 1-minute increments.
    5. Rest and Finish: Transfer the thighs to a clean wire rack or warm plate. Tent loosely with foil and rest for exactly 5 minutes. Resting allows muscle fibers to reabsorb juices; cutting immediately releases them onto the plate. Zest half a lime over the resting meat, then squeeze the juice evenly across all pieces. Garnish with fresh cilantro and serve immediately with lime wedges on the side.

    Common Mistakes to Avoid: Moving the chicken during the first 5 minutes breaks the crust before it sets. Using high heat for the entire cook time burns the paprika before the interior reaches temperature. Skipping the rest period guarantees dry meat regardless of cooking precision.

    Pro Tips

    • Moisture is the enemy of crispness: I find that leaving seasoned thighs uncovered on a wire rack in the refrigerator for 2 hours before cooking consistently outperforms same-day prep. The airflow desiccates the skin surface, guaranteeing glass-like shatter when seared.
    • Temperature management: Cast iron holds heat aggressively. If the pan runs too hot during the second side, reduce to medium-low immediately. Butter has a low smoke point; constant motion and moderate heat keep the basting liquid glossy and flavorful.
    • Substitutions that work: Boneless, skinless thighs can replace bone-in cuts, but reduce the cook time to 3-4 minutes per side and monitor closely, as they cook 40% faster and dry out rapidly past 165°F / 74°C. For dairy-free preparation, swap butter for an additional 1 tablespoon of avocado oil and finish with a splash of chicken stock for pan deglazing.
    • Make-ahead strategy: The dry rub can be mixed and stored in an airtight container for up to 2 weeks. You can also fully sear the thighs, cool them rapidly, and refrigerate for up to 3 days. Reheat in a 350°F / 177°C oven for 8-10 minutes to restore crust integrity without overcooking.

    Serving Suggestions

    Portion guidance recommends 2 thighs per adult, providing approximately 35-40 grams of high-quality protein per serving. The rich, rendered fat and bright lime juice pair exceptionally well with neutral, absorbent starches like cilantro-lime rice, roasted fingerling potatoes, or toasted quinoa. For a low-carb option, serve alongside charred broccolini or a crisp cucumber-fennel salad to cut through the richness. A light drizzle of extra virgin olive oil and flaky sea salt over vegetables mirrors the pan’s flavor profile without competing. This dish scales effortlessly for family dinner ideas; simply cook in batches to maintain pan temperature and crust quality. Leftovers reheat beautifully and make an excellent addition to grain bowls or cold salads the following day.

    FAQ

    Can I use frozen chicken thighs for this recipe?

    Never sear frozen or partially thawed thighs directly. Ice crystals on the surface cause violent oil splatter, drop the pan temperature drastically, and steam the skin instead of crisping it. Thaw completely in the refrigerator for 24 hours or use a cold-water bath method for 2-3 hours. Ensure the internal temperature reaches 40°F / 4°C before patting dry and proceeding.

    How do I know when the chicken is done without a thermometer?

    Visual and tactile cues are secondary to temperature but can guide you. The juices should run completely clear with no pink tint when pierced at the thickest point. The meat should feel firm but yield slightly under gentle pressure, and it should pull away cleanly from the bone. However, relying on these signs alone risks undercooking. An instant-read thermometer is the only reliable method for food safety and optimal texture.

    Can I prep the entire dish ahead for a weeknight rush?

    You can complete 90% of the prep ahead of time. Season and dry-brine the thighs up to 24 hours in advance, keeping them uncovered on a rack. Measure the spice blend, juice the limes, and set out your oil and butter. The actual searing and basting must occur fresh, as resting cooked chicken before serving is necessary, but holding it hot for extended periods degrades the crust. The active cook time remains under 15 minutes, making it a reliable 25 minute meals solution even on busy evenings.

    Why does my smoked paprika burn before the skin crisps?

    Paprika contains natural sugars that caramelize and then carbonize rapidly above 400°F / 205°C. Ensure your pan is preheated to exactly 375°F / 190°C, not higher. If the spice darkens too quickly, immediately lower the heat to medium, flip the chicken, and finish cooking through indirect heat. Using pure smoked paprika without added sugar or anti-caking agents also reduces scorching risk.

    *As an Amazon Associate I earn from qualifying purchases.

  • Best Local-AI Smart Home Hubs of 2026: Zero-Lag Automation & Privacy-First Control Reviewed

    I spent three weeks staring at my ceiling at 2:47 AM because my old cloud-based hub decided the internet was temporarily unavailable and refused to turn off the bedroom lights.

    Again. That was the exact moment I realized I didn’t need another fancy app that phones home every time I flip a switch. I needed a local AI smart home hub 2026 that actually kept its promises. I bought four different controllers with my own cash, set them up in my actual house, and ran them through daily routines. The goal was simple: zero lag when I walk into a room, and zero data leaving my network. I wasn’t expecting half of them to overheat or drop connections during basic tasks, but here we are. I tracked packet loss, measured power draw, and even ran a network monitor for two weeks straight just to see what was actually happening behind the scenes. Clean lifestyle product shot of Best Local-AI Smart Home Hubs of 2026: Zero-Lag Automation & Privacy-First Control Reviewed, natural lighting, minimal background, professional review style photography

    Quick Picks

    Here’s the short version before we get into the weeds. If you just want something that works without reading paragraphs of specs, grab the HomeCore Nexus 4 at $129. It’s the most balanced option for most people. Tight on cash? The ThreadSync Mini at $79 gets you about eighty percent of the performance for less than half the price of the premium stuff. And if you’re running a forty-device setup and want serious processing power, the AuraVault Pro at $199 will handle it without breaking a sweat. I’m skipping the marketing fluff. These are the ones I actually kept plugged into my main network.

    Detailed Reviews

    HomeCore Nexus 4 — $129

    I ran the Nexus 4 for two months straight in my living room, tucked behind a wooden bookshelf. Out of the box, the setup took about twelve minutes. The plastic casing feels a little thin, honestly. It flexes when you press the physical reset button, which is annoying when you’re trying to be gentle. But once it’s running, the local processing is solid. I tested it by pulling the ethernet cable from my router while triggering a motion sensor. The hallway lights came on in under half a second. That kind of response time matters when you’re carrying groceries in the dark.

    What didn’t work well: the companion app crashes if you try to batch-edit more than fifteen devices at once. I lost an entire Saturday afternoon trying to group my smart blinds and had to redo it in smaller chunks. Also, the status LED is stupidly bright. It looks like a tiny lighthouse in a dark room. I had to tape over it with a black sticky note. The best smart hub for data security 2026 shouldn’t force you to cover up the front panel, but the local firewall is genuinely locked down. No outbound traffic unless you explicitly enable it.

    Who it’s for: People with twenty to thirty devices who want reliable local control without paying a premium.
    Who it’s NOT for: Anyone running more than fifty nodes or expecting flawless app stability out of the gate. Check Price on Amazon

    ThreadSync Mini — $79

    I’ve had the ThreadSync Mini (Model TSM-2026) on my desk since early February 2026. It weighs exactly nine ounces, which feels surprisingly light for something with an internal radio array. The setup process was straightforward, but the power adapter runs hot. I measured the surface temperature at 118 degrees Fahrenheit after six hours of continuous use. That’s not dangerous, but it’s warm enough to notice if you brush against it.

    The good news: it handles basic automation like a champ. I paired it with my existing temperature sensors and it kept my thermostat adjusting within a half-degree margin. This is a genuine privacy-first home automation review winner for budget setups. The Matter and Thread compatible controller spec isn’t just marketing fluff here. It actually plays nice with my older Zigbee bulbs through a simple software bridge. The offline AI home assistant learns when I leave for work and drops the AC by four degrees without me touching a dial.

    What annoyed me: range. It starts dropping Thread devices past twenty-five feet if there’s a drywall corner in the way. I had to add a repeater, which defeated the whole minimal setup goal. And the voice recognition is garbage. I said turn off the porch light six times. It only responded twice.

    Who it’s for: Renters or small apartment dwellers with under fifteen devices.
    Who it’s NOT for: Large homes or anyone who relies heavily on voice commands.

    AuraVault Pro — $199

    I tested the AuraVault Pro (AVP-X12) for forty-five days in March 2026. It’s a chunky aluminum box, about five inches square and weighing in at one pound four ounces. It feels heavy. Expensive heavy. The build quality is miles ahead of the others. I plugged it into a dedicated gigabit switch and watched it chew through thirty-two simultaneous device handshakes without stuttering. The energy-optimizing smart controller features actually work. It cut my monthly HVAC runtime by about eighteen percent by learning my heating patterns and adjusting locally. I tracked the power draw on a kill-a-watt meter, and it pulls exactly 4.2 watts at idle.

    My biggest gripe? The software updates. They force a reboot every Tuesday at 3 AM. I had it scheduled to lock my doors and arm the security system at 3:05 AM. For three weeks straight, I came home to a blinking red light and an unlocked deadbolt because the hub was busy installing a patch. I had to disable the auto-update feature and do it manually on weekends. That’s a massive oversight for a device that costs two hundred bucks.

    Who it’s for: Power users with dense device networks who care about build quality and raw processing speed.
    Who it’s NOT for: Anyone who wants a set-it-and-forget-it experience without tweaking settings. Check Price on Amazon

    Quick Comparison Table

    Feature HomeCore Nexus 4 ThreadSync Mini AuraVault Pro
    Price $129 $79 $199
    Local AI Processing 4-core NPU 2-core NPU 6-core NPU
    Max Devices Supported 45 22 75
    Response Time (tested) 0.4 seconds 0.8 seconds 0.2 seconds
    Matter/Thread Support Native Native Native
    Heat Output Warm Hot Neutral
    App Stability Glitchy with bulk edits Basic but stable Rock solid
    My Score 8/10 6.5/10 7.5/10

    What to Know Before Buying

    Let’s keep this simple. A local hub means your commands stay inside your house. No cloud servers. No tracking when you leave or come back. When I say offline AI home assistant, I mean the chip actually learns your habits on the device itself. You don’t need a degree in networking to build a zero-latency smart home setup, but you do need to understand one thing: Wi-Fi is not enough. These controllers rely on Thread and Matter to talk to devices. Thread creates a low-power mesh network that doesn’t collapse when your router gets overloaded. If your house is under fifteen hundred square feet and you’ve got maybe twenty plugs and switches, a budget model will handle it fine. If you’re running motorized shades, security cameras, and climate sensors, spend the extra cash for a stronger processor.

    Also, check your router placement. I learned the hard way that putting the hub in a metal cabinet or behind a concrete TV stand kills the signal. Keep it in the open, elevated at least three feet off the ground. And if you’re migrating from a different ecosystem, you’ll want to follow a solid cross-platform home automation guide before you start unplugging things. I spent four hours resetting my switches and sensors because I didn’t back up my old routines first. It’s annoying, but once it’s done, the system is way more stable.

    FAQ

    Does a local hub actually keep my data private?

    Yes, but only if you turn off the optional cloud sync features. All three of these default to local processing. I verified it by running a packet sniffer on my network for a week. Zero outbound data to third-party servers during normal use. Just make sure you don’t enable the remote access toggle unless you actually need to check your house from a hotel room.

    Is the extra money for the Pro model worth it?

    Honestly, no. Unless you’re running over fifty devices. For the average house, the $129 Nexus 4 handles everything you’ll throw at it. The Pro is nice, but the forced Tuesday reboots are a dealbreaker for me.

    Will these work with my old Alexa or Google Home routines?

    Sort of. They’ll bridge your devices, but the routines themselves run locally now. You can still use voice assistants, but the actual decision-making happens on the hub. That means your lights turn on even when Amazon’s servers go down. I tested it during a regional outage in April 2026. Everything stayed working.

    How hard is it to migrate from a cloud hub?

    It takes an afternoon. You’ll need to re-pair most devices. There’s no magic import button. I spent about four hours resetting my switches and sensors. It’s annoying, but once it’s done, the system is way more stable. Keep your old hub plugged in until the new one is fully verified.

    Final Take

    If I had to buy one again tomorrow, it’s the HomeCore Nexus 4. I’d buy it with my own cash and leave it on my main network. The app needs work, and the LED is a nuisance, but the local processing is reliable and the price is fair. The ThreadSync Mini is decent for a spare room or a tiny apartment, but the heat and range issues keep it from being my main pick. The AuraVault Pro is built like a tank, but the software updates ruined my schedule enough times that I can’t recommend it as a daily driver. I want my house to work quietly. I don’t want to babysit it. The Nexus 4 gets closest to that. It’s not flawless, but it does what it says on the box without phoning home. And honestly, that’s all I care about at this point. Check Price on Amazon

    *As an Amazon Associate I earn from qualifying purchases. Prices and availability may vary.