Introduction
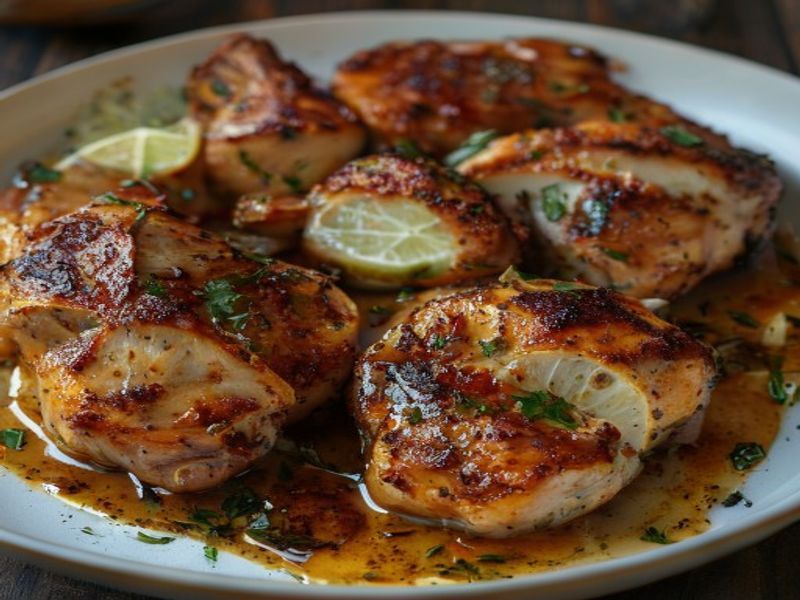
This pan-seared chicken thighs recipe delivers restaurant-quality results through precise temperature control and a balanced spice blend. The high fat content of bone-in thighs renders beautifully under direct heat, creating a crackling crust while keeping the meat exceptionally juicy. A bold smoked paprika lime recipe provides the perfect counterpoint: earthy heat meets bright acidity, cutting through the richness without overwhelming the palate. Designed as a quick weeknight dinner, this method requires minimal active time and delivers consistent results in under 30 minutes. It is ideal for beginner to intermediate home cooks who want a reliable, high protein dinner that scales easily for family dinner ideas. Mastering this technique builds foundational skills for easy cast iron chicken and other bold flavor recipes. The process relies entirely on visual cues and timing rather than guesswork, ensuring a healthy dinner inspiration you can repeat with confidence every week.
What You’ll Need
Ingredients
- 8 bone-in, skin-on chicken thighs (approximately 1.5 pounds total): Select thighs with even thickness and intact skin. The bone retains moisture during high-heat cooking.
- 1 tablespoon smoked paprika: Use Spanish pimentón for authentic depth. Avoid generic blends with added salt.
- 1.5 teaspoons kosher salt: Diamond Crystal preferred for accurate measurement by volume.
- 0.5 teaspoon freshly ground black pepper: Coarse grind provides better surface adhesion and texture.
- 0.5 teaspoon garlic powder: Do not substitute fresh garlic here, as it burns at high pan temperatures.
- 0.25 teaspoon cayenne pepper: Adjust to 0.5 teaspoon for a noticeably spicy citrus chicken profile.
- 1.5 tablespoons high-smoke-point oil (avocado or refined olive oil): Provides initial heat transfer without smoking prematurely.
- 2 tablespoons unsalted butter: Cold butter emulsifies during basting, creating a glossy finish.
- 2 fresh limes: 1 zested and juiced, 1 cut into wedges for finishing.
- 1 tablespoon fresh cilantro, finely chopped: Optional garnish for color and freshness.
Equipment
- 12-inch cast iron skillet: Retains heat evenly and develops superior crust. 12-inch cast iron skillet [Check Price on Amazon
- Instant-read digital thermometer: Essential for verifying doneness without cutting into the meat.
- Stainless steel tongs: Provides secure grip and precise placement.
- Small mixing bowl: For combining dry rub ingredients uniformly.
- Paper towels: For thorough moisture removal before seasoning.
Prep Work
Proper preparation determines crust quality and cooking consistency. Begin by patting the chicken thighs completely dry with paper towels on both sides. Moisture on the skin surface creates steam, which prevents browning. Remove the thighs from refrigeration and let them rest at room temperature for 15-20 minutes (targeting 65°F / 18°C). Cold meat hitting a hot pan drops the surface temperature too quickly, resulting in uneven cooking and sticking. In a small bowl, combine the smoked paprika, kosher salt, black pepper, garlic powder, and cayenne. Whisk thoroughly to distribute the cayenne evenly, preventing hot spots in the final bite. Season the chicken generously on all sides, pressing the rub firmly into the skin. If time allows, place the seasoned thighs uncovered on a wire rack in the refrigerator for up to 24 hours. This dry-brining process pulls additional moisture from the skin while seasoning the meat internally. When ready to cook, ensure your work surface is clear and your thermometer is calibrated. This 25 minute meals timeline depends entirely on having every component measured, dried, and within reach before the pan touches the burner.
Cooking Instructions
- Preheat the Skillet: Place your 12-inch cast iron skillet over medium-high heat for 4-5 minutes. Add the 1.5 tablespoons of oil and tilt the pan to coat the surface evenly. Heat until the oil reaches 375°F / 190°C. You will know it is ready when the oil shimmers, moves like water, and the first drop of water sizzles and evaporates instantly. Do not let it smoke, as the paprika will burn.
- Sear Skin-Side Down: Carefully place the thighs skin-side down into the hot pan, starting from the edge closest to you to avoid splatter. Do not overcrowd; leave at least 0.5 inches between pieces. Press each thigh gently with tongs for 10 seconds to ensure full skin contact. Leave completely undisturbed for 6-7 minutes. Watch for the edges to turn opaque and golden, while the fat renders visibly. A steady, aggressive sizzle should gradually soften to a gentle hiss as moisture evaporates.
- Flip and Baste: Once the skin releases naturally from the pan and displays a deep mahogany crust, flip the thighs using tongs. Reduce heat to medium. Add the 2 tablespoons of cold butter to the pan. Tilt the skillet slightly and spoon the foaming butter continuously over the meat for 4-5 minutes. The butter will turn nutty brown; keep it moving to prevent scorching. The internal temperature should climb steadily toward 175°F / 79°C.
- Verify Doneness: Insert an instant-read thermometer into the thickest part of the meat, avoiding the bone. Pull the chicken at 175°F / 79°C. While poultry is safe at 165°F / 74°C, thighs contain more connective tissue that breaks down optimally at higher temperatures, yielding tender, juicy meat. If under target, continue basting in 1-minute increments.
- Rest and Finish: Transfer the thighs to a clean wire rack or warm plate. Tent loosely with foil and rest for exactly 5 minutes. Resting allows muscle fibers to reabsorb juices; cutting immediately releases them onto the plate. Zest half a lime over the resting meat, then squeeze the juice evenly across all pieces. Garnish with fresh cilantro and serve immediately with lime wedges on the side.
Common Mistakes to Avoid: Moving the chicken during the first 5 minutes breaks the crust before it sets. Using high heat for the entire cook time burns the paprika before the interior reaches temperature. Skipping the rest period guarantees dry meat regardless of cooking precision.
Pro Tips
- Moisture is the enemy of crispness: I find that leaving seasoned thighs uncovered on a wire rack in the refrigerator for 2 hours before cooking consistently outperforms same-day prep. The airflow desiccates the skin surface, guaranteeing glass-like shatter when seared.
- Temperature management: Cast iron holds heat aggressively. If the pan runs too hot during the second side, reduce to medium-low immediately. Butter has a low smoke point; constant motion and moderate heat keep the basting liquid glossy and flavorful.
- Substitutions that work: Boneless, skinless thighs can replace bone-in cuts, but reduce the cook time to 3-4 minutes per side and monitor closely, as they cook 40% faster and dry out rapidly past 165°F / 74°C. For dairy-free preparation, swap butter for an additional 1 tablespoon of avocado oil and finish with a splash of chicken stock for pan deglazing.
- Make-ahead strategy: The dry rub can be mixed and stored in an airtight container for up to 2 weeks. You can also fully sear the thighs, cool them rapidly, and refrigerate for up to 3 days. Reheat in a 350°F / 177°C oven for 8-10 minutes to restore crust integrity without overcooking.
Serving Suggestions
Portion guidance recommends 2 thighs per adult, providing approximately 35-40 grams of high-quality protein per serving. The rich, rendered fat and bright lime juice pair exceptionally well with neutral, absorbent starches like cilantro-lime rice, roasted fingerling potatoes, or toasted quinoa. For a low-carb option, serve alongside charred broccolini or a crisp cucumber-fennel salad to cut through the richness. A light drizzle of extra virgin olive oil and flaky sea salt over vegetables mirrors the pan’s flavor profile without competing. This dish scales effortlessly for family dinner ideas; simply cook in batches to maintain pan temperature and crust quality. Leftovers reheat beautifully and make an excellent addition to grain bowls or cold salads the following day.
FAQ
Can I use frozen chicken thighs for this recipe?
Never sear frozen or partially thawed thighs directly. Ice crystals on the surface cause violent oil splatter, drop the pan temperature drastically, and steam the skin instead of crisping it. Thaw completely in the refrigerator for 24 hours or use a cold-water bath method for 2-3 hours. Ensure the internal temperature reaches 40°F / 4°C before patting dry and proceeding.
How do I know when the chicken is done without a thermometer?
Visual and tactile cues are secondary to temperature but can guide you. The juices should run completely clear with no pink tint when pierced at the thickest point. The meat should feel firm but yield slightly under gentle pressure, and it should pull away cleanly from the bone. However, relying on these signs alone risks undercooking. An instant-read thermometer is the only reliable method for food safety and optimal texture.
Can I prep the entire dish ahead for a weeknight rush?
You can complete 90% of the prep ahead of time. Season and dry-brine the thighs up to 24 hours in advance, keeping them uncovered on a rack. Measure the spice blend, juice the limes, and set out your oil and butter. The actual searing and basting must occur fresh, as resting cooked chicken before serving is necessary, but holding it hot for extended periods degrades the crust. The active cook time remains under 15 minutes, making it a reliable 25 minute meals solution even on busy evenings.
Why does my smoked paprika burn before the skin crisps?
Paprika contains natural sugars that caramelize and then carbonize rapidly above 400°F / 205°C. Ensure your pan is preheated to exactly 375°F / 190°C, not higher. If the spice darkens too quickly, immediately lower the heat to medium, flip the chicken, and finish cooking through indirect heat. Using pure smoked paprika without added sugar or anti-caking agents also reduces scorching risk.
*As an Amazon Associate I earn from qualifying purchases.
发表回复