Introduction
This 20-minute pan-seared harissa-honey chicken thighs recipe delivers a reliable, high-protein dinner that balances heat and sweetness with professional precision. The technique relies on controlled heat management, proper protein drying, and a rapid emulsified glaze that clings without burning. Designed as a quick weeknight dinner, this method eliminates guesswork by using exact temperatures and visual benchmarks. It works equally well for novice cooks and experienced home chefs because the timing windows are narrow but highly forgiving when the foundational steps are followed. The result is consistently juicy meat, a deeply caramelized exterior, and a sticky, spicy sweet chicken finish that requires minimal cleanup. This is an easy skillet meal built for efficiency, making it an ideal one-pan cooking solution that aligns perfectly with gluten free dinner requirements and healthy weeknight recipes.
What You’ll Need
Ingredients
- 1.5 pounds (680g) boneless, skin-on chicken thighs: Choose uniform pieces, approximately 6 ounces each. Skin-on provides natural fat for rendering and protects the meat during high-heat searing.
- 1.5 teaspoons kosher salt: Divided for seasoning. Fine sea salt works, but kosher salt adheres better and distributes more evenly.
- 1/2 teaspoon freshly cracked black pepper: Provides aromatic base notes that complement the harissa.
- 2 tablespoons high-smoke-point oil: Avocado oil or refined grapeseed oil. Do not use extra virgin olive oil for the initial sear, as it will smoke and break down at the required temperatures.
- 3 tablespoons harissa paste: Use a smooth or semi-smooth North African variety for consistent glaze texture. Check labels for added sugars to control caramelization speed.
- 2 tablespoons raw honey: Provides viscosity and rapid browning. Avoid heavily processed syrups, which lack the necessary fructose structure for proper caramelization.
- 1 tablespoon apple cider vinegar: Cuts through the richness and helps stabilize the glaze emulsion.
- 1 tablespoon unsalted butter, cold: Added at the end to finish the sauce with a glossy, restaurant-quality sheen.
Equipment
- 12-inch cast iron skillet or heavy-bottomed carbon steel pan [Check Price on Amazon]
- Digital instant-read thermometer [Check Price on Amazon]
- Paper towels (for thorough protein drying)
- Small mixing bowl and silicone whisk
- Stainless steel tongs and heat-resistant silicone spatula
Prep Work
Proper preparation dictates the success of any 20-minute chicken recipe. Begin by removing the chicken from the refrigerator 15 minutes before cooking. Allowing the protein to approach 55°F / 13°C ensures even heat penetration and prevents the exterior from burning before the interior cooks. While the chicken rests, pat each thigh completely dry using three layers of paper towels. Moisture is the primary enemy of the Maillard reaction; any residual liquid will steam the meat instead of searing it. Season both sides evenly with 1 teaspoon kosher salt and 1/2 teaspoon black pepper. Set the seasoned thighs on a wire rack to prevent the skin from absorbing salt and moisture back into the surface.
In a small bowl, whisk together 3 tablespoons harissa paste, 2 tablespoons honey, and 1 tablespoon apple cider vinegar until fully emulsified. The mixture should have a thick, spreadable consistency similar to heavy cream. Keep this glaze within arm’s reach of the stove. Preheat your oven to 375°F / 190°C if you plan to finish thicker cuts, though the stovetop-only method below achieves perfect results when timed correctly. All components should be measured and staged before heating the pan, as the active cooking window moves quickly.
Cooking Instructions
- Heat the pan and oil: Place your 12-inch cast iron skillet over medium-high heat. Add 2 tablespoons of high-smoke-point oil. Heat until the oil reaches 375°F / 190°C, which takes approximately 2 to 3 minutes. You will know the oil is ready when it shimmers and creates thin, parallel ripples across the surface. If the oil begins to smoke heavily, reduce the heat immediately to 350°F / 177°C and wait 30 seconds for stabilization.
- Initial sear (skin side down): Using tongs, carefully lay the chicken thighs into the pan, skin side down, placing them away from you to avoid oil splatter. Do not crowd the pan; cook in batches if necessary. Press each thigh down firmly with the tongs for 5 seconds to ensure full surface contact. Cook undisturbed for exactly 4 minutes. Watch for the edges to turn opaque and white, climbing approximately one-third up the side of the meat. You should hear a consistent, aggressive sizzle. If the sound becomes quiet or stops, the pan has cooled and needs 1 minute to recover.
- Flip and second sear: Flip each thigh using tongs. The skin should be a uniform golden-brown with crisp, lacquered edges. If it appears pale, cook for an additional 30 to 60 seconds. Once flipped, reduce heat to medium (325°F / 163°C surface temp) and cook the flesh side for 3 minutes. This lower temperature prevents the exterior from overcooking while allowing the interior to reach the proper doneness range.
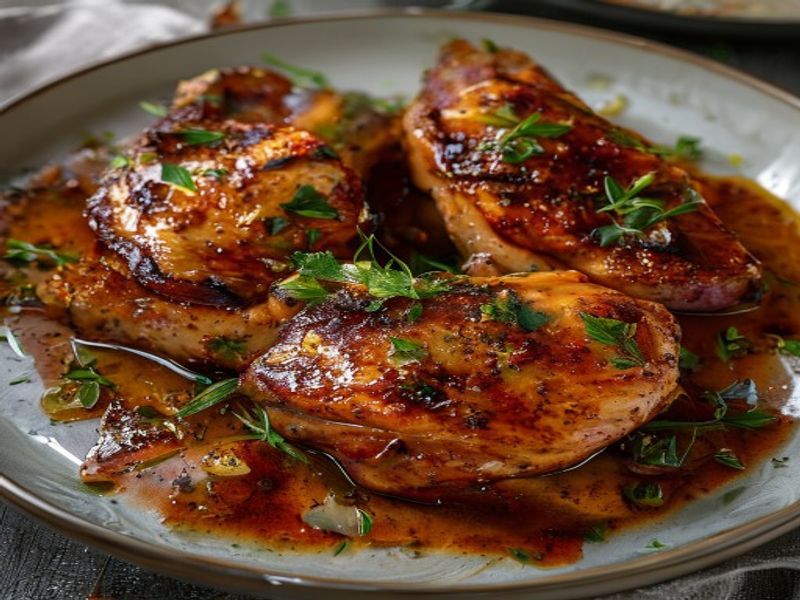
- Apply glaze and finish: Pour the prepared harissa-honey mixture evenly over the chicken. Tilt the pan to distribute the liquid. Cook for exactly 90 seconds, spooning the bubbling sauce over the tops continuously. The glaze will reduce, thicken, and coat the back of your silicone spatula. Remove the pan from heat entirely. Immediately add 1 tablespoon of cold butter, swirling the pan until the butter melts and emulsifies into the sauce, creating a glossy, cohesive coating.
- Rest and verify temperature: Transfer the chicken to a clean cutting board. Insert an instant-read thermometer horizontally into the thickest part of a thigh. The internal temperature must read 165°F / 74°C. If it reads 160°F / 71°C, carryover cooking will safely bring it to target during the 5-minute rest period. Do not slice immediately; resting allows the muscle fibers to reabsorb juices. Spoon the remaining pan glaze over the rested meat before serving.
Pro Tips
- Temperature control is non-negotiable: I find that most home cooks rush the initial heat-up phase, which results in steaming rather than searing. Always verify your pan surface temperature before adding protein. A properly preheated pan creates an instant crust that locks in moisture.
- Glaze timing prevents bitterness: Honey and harissa both contain natural sugars that caramelize rapidly. Adding the glaze only during the final 90 seconds ensures it reduces properly without burning or developing acrid notes. If you add it too early, the pan temperature will drop and the chicken will braise instead of sear.
- Butter finishing for texture: In my experience, mounting the pan sauce with cold butter off-heat creates a stable emulsion that clings to the meat rather than pooling at the bottom. The milk solids in the butter also add a subtle richness that balances the harissa’s capsaicin heat.
- Make-ahead option: You can season the chicken up to 12 hours in advance and store it uncovered on a rack in the refrigerator. This dry-brine technique draws out surface moisture, yielding an exceptionally crisp crust with zero extra prep time on cooking day.
Serving Suggestions
Plan for two thighs per adult serving, delivering approximately 45 grams of high-quality protein. This dish pairs optimally with neutral, absorbent bases that balance the spicy sweet chicken profile. Serve alongside 1 cup of cooked couscous, quinoa, or roasted sweet potatoes. A quick side of charred lemon halves and a simple cucumber-mint salad cuts through the richness while adding necessary acidity. For complete meal prep efficiency, portion the pan-seared chicken thighs into airtight containers with roasted broccoli and a light tahini drizzle. The glaze holds well for up to 4 days refrigerated and reheats evenly at 350°F / 177°C for 8 minutes without drying out.
FAQ
Can I use frozen chicken thighs for this recipe?
Do not cook frozen chicken directly in this method. Ice crystals lower the pan surface temperature below 285°F / 140°C, which prevents crust formation and causes the meat to steam in its own released moisture. Thaw completely in the refrigerator for 24 hours, then proceed with the drying and seasoning steps. If pressed for time, seal the frozen thighs in a vacuum bag or heavy zipper bag and submerge in cold water for 45 to 60 minutes until fully thawed.
How do I know when it’s done without cutting into it?
Rely exclusively on an instant-read thermometer. Insert the probe horizontally into the thickest part of the thigh, avoiding the pan or any bone fragments. The target is 165°F / 74°C. Visual indicators include clear juices when the meat is gently pressed and a firm but yielding resistance. If you do not own a thermometer, slice the thickest piece; the interior should be opaque with no translucent pink areas near the center.
Can I prep the glaze ahead and store it?
Yes. The harissa-honey mixture can be whisked and stored in a sealed glass container in the refrigerator for up to 7 days. Before using, let it sit at room temperature for 10 minutes and whisk vigorously to recombine. The vinegar and honey act as natural preservatives, but do not add the cold butter until the final cooking stage, as pre-mixed butter will separate and create a greasy, broken sauce.
What if I only have bone-in, skin-on thighs?
Bone-in thighs work well but require adjusted timing. Start skin-side down for 6 minutes to render the thicker fat cap. Flip and cook for 5 minutes on the flesh side before adding the glaze. Because the bone acts as a heat sink, the internal temperature will rise more slowly. Transfer the skillet to a 400°F / 204°C oven for 4 to 5 minutes after glazing to ensure the meat near the bone reaches 165°F / 74°C safely.
*As an Amazon Associate I earn from qualifying purchases.
发表回复