Introduction
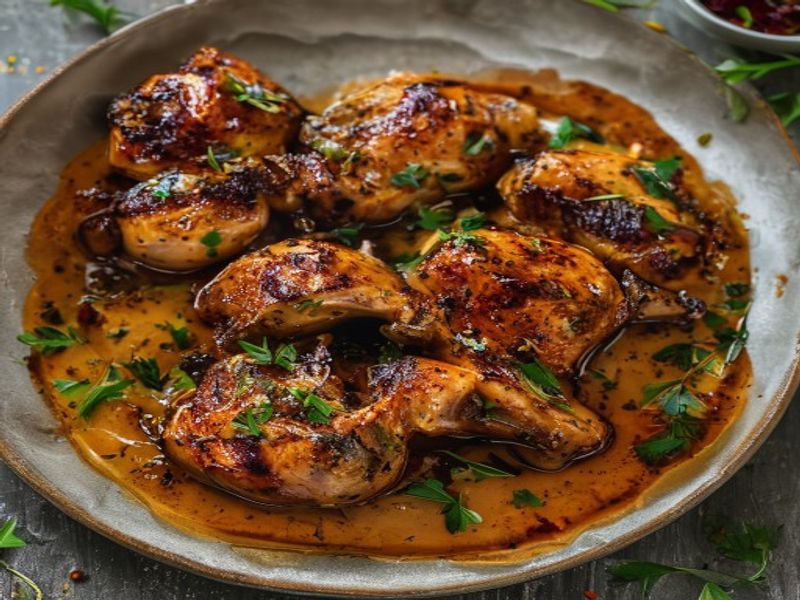
This harissa honey chicken thighs recipe delivers a professional-grade balance of heat, sweetness, and savory depth in exactly 30 minutes. By leveraging high-heat roasting and a carefully timed glaze application, you achieve crispy baked poultry with a caramelized crust that stays tender underneath. The technique relies on moisture control and thermal management rather than complicated methods, making this an ideal oven roasted chicken recipe for beginner to intermediate cooks. The spice blend penetrates quickly while the honey provides surface caramelization during the final minutes of cooking. As a 30 minute weeknight dinner, it eliminates unnecessary prep and delivers consistent results on a single sheet pan. Whether you are planning easy family meal ideas or batch-cooking meal prep friendly chicken, this formula scales cleanly and holds its texture well after refrigeration. The result is a one pan spicy sweet chicken dish that bridges quick execution with restaurant-level flavor development.
What You’ll Need
Ingredients
- Chicken thighs: 1.5 pounds (approx. 6 thighs, bone-in, skin-on). Bone-in cuts retain moisture during high heat; ensure each piece weighs 4 to 5 ounces for even cooking.
- Harissa paste: 3 tablespoons. Use a North African-style paste with a balanced chili-to-spice ratio, not a watery sauce.
- Honey: 2 tablespoons. Standard clover or wildflower honey works best; avoid overly thick raw honey that resists emulsification.
- Extra-virgin olive oil: 1 tablespoon. Provides fat for heat transfer and prevents the glaze from scorching.
- Garlic: 3 cloves, finely minced or pressed. Fresh cloves deliver sharper aromatics than jarred alternatives.
- Lemon juice: 1 tablespoon. Adds acidity to cut through the honey and brighten the spice profile.
- Smoked paprika: 1 teaspoon. Adds depth without increasing heat intensity.
- Ground cumin: 0.5 teaspoon. Provides earthy warmth that anchors the chili notes.
- Kosher salt: 0.75 teaspoon. Adjust to 1 teaspoon if using fine table salt.
- Black pepper: 0.25 teaspoon, freshly cracked.
- Fresh cilantro: 1 tablespoon, chopped. Optional garnish for freshness and color contrast.
Equipment
- 9×13 inch rimmed baking sheet: Provides adequate surface area for air circulation and prevents steaming.
- Instant-read thermometer: Check Price on Amazon Essential for verifying doneness without guessing.
- Small mixing bowl: 1-cup capacity for emulsifying the glaze.
- Silicone basting brush: Allows even, controlled glaze application without tearing skin.
- Wire rack (optional): Elevates thighs for maximum bottom crispness.
Prep Work
Proper preparation dictates the final texture of this simple chicken dinner recipe. Remove the chicken from refrigeration 15 minutes before roasting to reduce thermal shock and promote even cooking. Pat each thigh thoroughly dry with 3 to 4 paper towels. Surface moisture is the primary enemy of crispy baked poultry; any remaining water will steam the skin instead of allowing it to render and crisp. While the chicken rests, preheat your oven to 425°F / 220°C. High initial heat is non-negotiable for proper fat rendering and Maillard reaction development.
In your mixing bowl, whisk together the 3 tablespoons harissa paste, 2 tablespoons honey, 1 tablespoon olive oil, minced garlic, 1 tablespoon lemon juice, 1 teaspoon smoked paprika, 0.5 teaspoon cumin, 0.75 teaspoon kosher salt, and 0.25 teaspoon black pepper until fully emulsified. The mixture should coat the back of a spoon evenly without separating. Reserve exactly half of the glaze for the final roasting stage. This quick harissa glaze will be applied in two phases to prevent sugar burn.
You can measure and whisk the glaze up to 24 hours in advance and store it covered in the refrigerator. The chicken can be patted dry, seasoned with salt only, and held uncovered in the refrigerator for up to 12 hours to dry the skin further, a technique I frequently use in professional kitchens to guarantee shattering crispness.
Cooking Instructions
- Arrange and Season: Place the dried chicken thighs skin-side up on the prepared 9×13 inch baking sheet. Space them at least 1 inch apart. Crowding traps steam and creates soggy skin. Lightly dust the skin with 0.25 teaspoon kosher salt to draw out residual moisture.
- First Roast Phase (15 minutes): Transfer the sheet to the preheated 425°F / 220°C oven. Roast undisturbed for exactly 15 minutes. You will hear steady sizzling as subcutaneous fat renders. The skin should transition from pale to light golden and begin pulling slightly from the bone ends. Do not brush the glaze yet; honey burns at approximately 265°F / 129°C, and early application will carbonize before the meat cooks through.
- Apply Initial Glaze: Remove the pan using heat-resistant gloves. Using the silicone brush, apply half of the reserved glaze evenly over the skin surface. Work quickly to minimize heat loss. The glaze should bead slightly but not pool.
- Second Roast Phase (10-12 minutes): Return the pan to the oven. Roast for 10 minutes, then rotate the sheet 180 degrees to compensate for oven hot spots. Continue roasting for 2 to 3 additional minutes. Watch for the edges of the glaze to darken to deep mahogany and bubble vigorously. If the edges begin to smoke, lower the oven temperature to 400°F / 205°C immediately.
- Verify Doneness: Insert an instant-read thermometer into the thickest part of the meat, avoiding the bone. The target internal temperature is 175°F / 79°C for thighs. While safe at 165°F / 74°C, dark meat benefits from slightly higher temperatures to fully break down connective tissue and achieve tender, pull-apart texture. The juices should run clear, not pink.
- Rest and Finish: Transfer the pan to a wire rack or heat-safe surface. Brush the remaining reserved glaze over the hot thighs. The residual heat will gently set the second layer without burning it. Rest the chicken for exactly 5 minutes before serving. This allows the muscle fibers to reabsorb moisture, preventing dry cuts.
Pro Tips
Glaze Timing is Critical: Sugar-based glazes must only be introduced during the final third of cooking. In my experience, home cooks frequently apply honey-based sauces at the start, resulting in bitter, blackened crusts while the interior remains undercooked. The two-stage application guarantees caramelization without carbonization.
Harissa Selection Matters: Commercial harissa varies wildly in heat and moisture content. If your paste is exceptionally wet, drain it in a fine-mesh strainer for 10 minutes before mixing. Excess water disrupts the emulsion and prevents proper adhesion to the skin.
Meal Prep Optimization: This healthy roasted meat stores exceptionally well. Cool completely within 2 hours, then portion into airtight containers. The skin will soften in the refrigerator but recrisps quickly in a 375°F / 190°C air fryer or toaster oven for 4 to 5 minutes. Substitute boneless, skinless thighs only if you reduce the total cook time by 5 to 7 minutes and monitor temperature closely, as lean meat dries out rapidly.
Serving Suggestions
Balance the rich, spicy-sweet profile with neutral or acidic accompaniments. Serve over 1.5 cups of fluffy couscous or roasted cauliflower steaks. A 0.5-cup portion of cucumber-yogurt sauce (mix 0.5 cup plain Greek yogurt, 1 tablespoon lemon juice, and a pinch of salt) cuts through the fat and refreshes the palate. For easy family meal ideas, pair with quick-sautéed green beans tossed with garlic and lemon zest. Standard portioning is two thighs per adult, yielding approximately 6 ounces of edible meat after bone removal. This scales cleanly for 2 to 4 servings without adjusting ratios.
FAQ
Can I use frozen chicken thighs?
Do not roast from frozen. Ice crystals create steam pockets that prevent skin crisping and cause dangerous temperature gradients. Thaw completely in the refrigerator for 24 hours or use the cold-water method, changing the water every 30 minutes until the internal temperature reaches 32°F / 0°C. Pat thoroughly dry before proceeding.
How do I know when it’s done without a thermometer?
While a thermometer is the only reliable method, visual and tactile cues include: the meat pulls away from the bone tips by 0.25 inches, juices run completely clear when pierced at the joint, and the thickest part yields easily to gentle pressure. However, relying on these cues alone carries a higher risk of undercooking or overcooking.
Can I prep this ahead for dinner service?
Yes. Mix the glaze and dry the chicken up to 12 hours in advance. Store the glaze covered in the refrigerator and keep the chicken uncovered on a wire rack over a sheet pan to continue drying the skin. When ready to cook, follow the exact roasting timeline. The dish holds at room temperature for up to 1 hour, but for food safety, serve within 2 hours of leaving the oven.
Why are my thighs not getting crispy?
Three factors cause soggy skin: residual surface moisture, overcrowding the pan, or applying the glaze too early. Ensure you use 3 to 4 paper towels per batch, maintain at least 1 inch of spacing between thighs, and strictly follow the delayed glazing method. Oven calibration also matters; verify your actual temperature with an oven thermometer if results consistently fall short.
*As an Amazon Associate I earn from qualifying purchases.
发表回复